thomasguenzel.com

Apps/Programming

Category: Tutorial

Changing the Application Language in AppCode

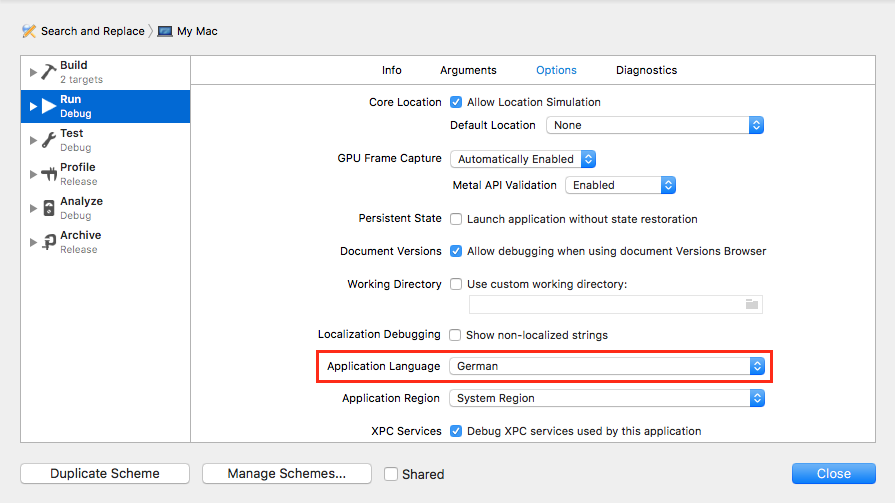
When developing apps that support multiple languages I used to set the system language in the iOS Simulator settings, which required a complete reboot of the simulator. I then discovered the Application Language setting when editing build schemes in XCode under the Options tab.

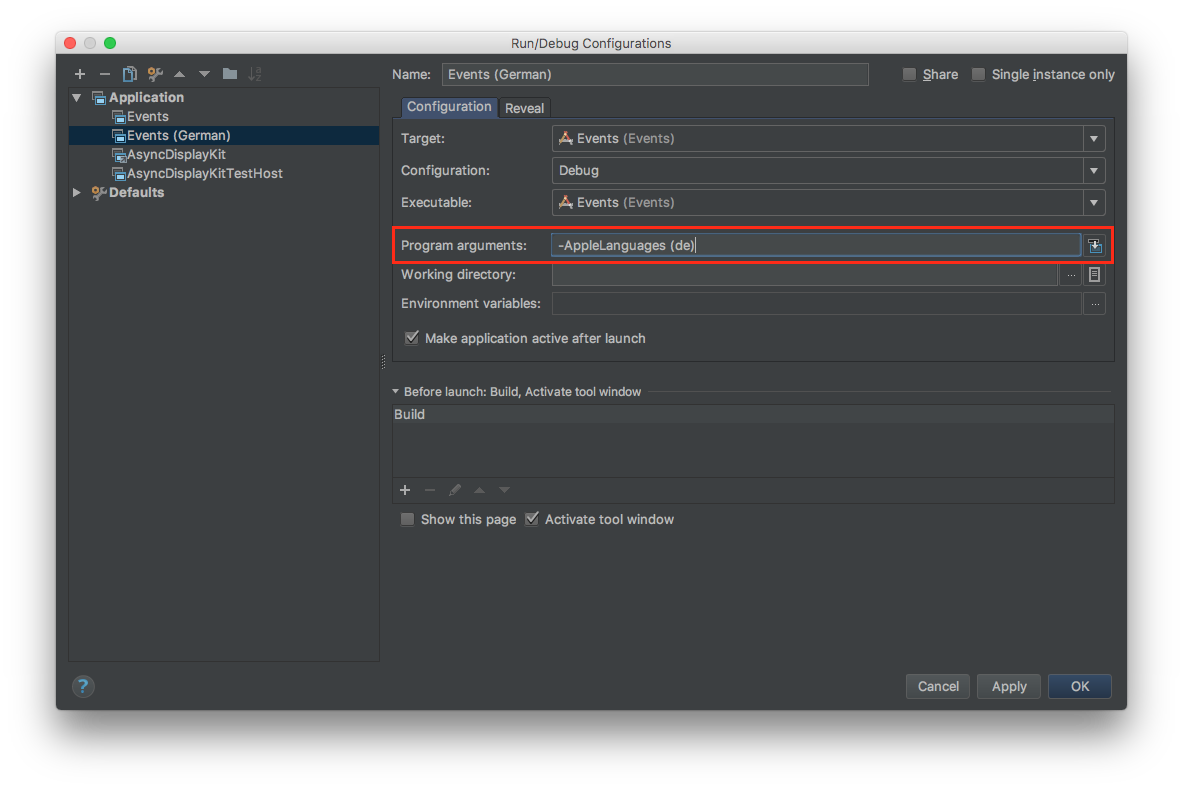
Unfortunately, AppCode doesn’t have this option (or maybe I just didn’t find it). But an easy workaround is to choose Edit Configurations… in AppCode and specifying the following as Program Arguments:

-AppleLanguages (de)

where “de” specifies the language, in this case German, although “German” or “de_DE” will also work.

To easily switch between different languages, you can copy the configuration for each language and set the corresponding language code.

iOS – Displaying a Popover on an iPhone

You can find the source code for this project on GitHub.

As UIPopoverController is deprecated since iOS 9 and I couldn’t find a great example on how to create a popover on an iPhone with iOS 9 I’ve created a small project that demonstrates how to create one.

Here are the important lines of code

- (IBAction)openPopup:(id)sender {
	// popoverViewController is a instance variable of type UIViewController
	if(popoverViewController == nil) {
		popoverViewController = [self.storyboard instantiateViewControllerWithIdentifier:@"popover"];
		
	}
	popoverViewController.preferredContentSize = CGSizeMake(320, 100);
	popoverViewController.modalPresentationStyle = UIModalPresentationPopover;
	UIPopoverPresentationController *popoverController = popoverViewController.popoverPresentationController;
	popoverController.permittedArrowDirections = UIPopoverArrowDirectionDown | UIPopoverArrowDirectionUp;
	popoverController.delegate = self;
	popoverController.sourceView = self.view;
	popoverController.sourceRect = [sender frame];
	
	[self presentViewController:popoverViewController animated:YES completion:nil];
}

-(UIModalPresentationStyle)adaptivePresentationStyleForPresentationController:(UIPresentationController *)controller {
	return UIModalPresentationNone;
}

UIActivityViewController NSData with Filename

In one of my upcoming apps I want the user to be able to send a file using the UIActivityViewController. As I create the NSData object during runtime, I passed the data to the activity view like this:

NSData *someData = /*...*/;
UIActivityViewController *activityViewController = [[UIActivityViewController alloc] initWithActivityItems:@[someData] applicationActivities:nil];

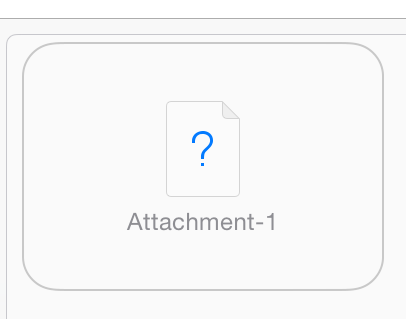
But unfortunately this resulted in something like this:

without_filename

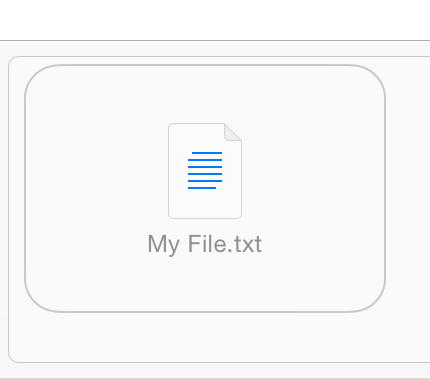
So in order to get a filename instead of “Attachment-1” I create a file in the temporary directory and pass the activity view the url.

// create url
NSURL *url = [NSURL fileURLWithPath:[NSTemporaryDirectory() stringByAppendingString:@"My File.txt"]];
NSData *data = /*...*/;
// write data
[dataToWrite writeToURL:url atomically:NO];

// create activity view controller
UIActivityViewController *activityViewController = [[UIActivityViewController alloc] initWithActivityItems:@[url] applicationActivities:nil];
[activityViewController setCompletionWithItemsHandler:^(NSString *activityType, BOOL completed, NSArray *returnedItems, NSError *activityError) {
	//Delete file
	NSError *errorBlock;
	if([[NSFileManager defaultManager] removeItemAtURL:url error:&errorBlock] == NO) {
		NSLog(@"error deleting file %@",error);
		return;
	}
}];

As a result, the messages screen looks now like this:

with_filename

iOS 7 Launch Status Bar Color

Xcode hasn’t got the ‘Light Content’-statusbar style in the drop-down menu at the moment. For one of my apps I have a mainly black launch image you could only see the battery sign, nothing else. So to get your App to start with a white statusbar you need to enter UIStatusBarStyleLightContent manually into the Info.plist.

Screen Shot 2014-02-19 at 17.54.05

Setting up a File Type for your Mac App

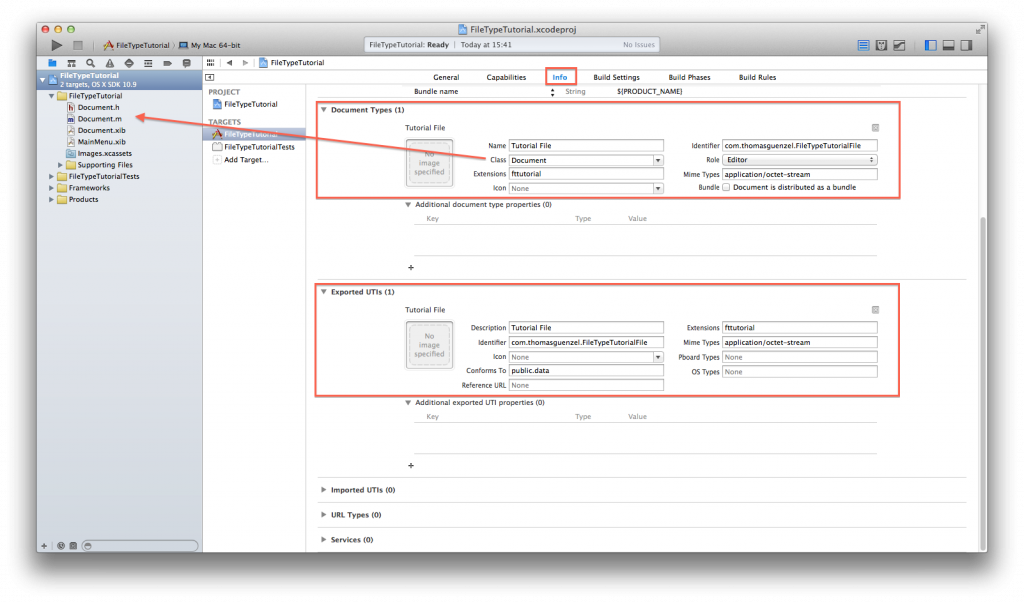
As I often have problems setting up a custom filetype for my Document-Based Applications I decided to write a short tutorial on how to do it (actually just one image). You just need to enter most of the information twice, once for the Document Type and once for the Exported UTI.
Look at those two lists for what types you have to choose:
List of Uniform Type Identifiers
Wikipedia Article about MIME (including common types)

filetypetut

OpenGL ES 2.0 Render to UIImage

So I’ve struggled quite a bit getting a UIImage from my OpenGL view, as most of the stackoverflow.com posts were about OpenGL ES 1.0 (which seems a little bit different from 2.0). A few days later i contact the Apple Support as i had a few help-tickets left and they were able to tell me one line I was missing in my code. As this may be helpful to other programmers i decided to post it here. Here’s the source code (just replace the ‘draw code here’-comment with your code).

@interface RenderToImage()
{
	EAGLContext* myContext;
	GLuint framebuffer;
	GLuint colorRenderbuffer;
	GLuint depthRenderbuffer;

	int width;
	int height;
}
@end

@implementation RenderToImage

- (id) init
{
	self = [super init];
	if (self)
	{

	}
	return self;
}

-(void) setupOpenGL
{
	[EAGLContext setCurrentContext:myContext];

	glGenFramebuffersOES(1, &framebuffer);
	glBindFramebufferOES(GL_FRAMEBUFFER, framebuffer);

	glGenRenderbuffersOES(1, &colorRenderbuffer);
	glBindRenderbufferOES(GL_RENDERBUFFER, colorRenderbuffer);
	glRenderbufferStorageOES(GL_RENDERBUFFER, GL_RGBA8_OES, width, height);
	glFramebufferRenderbufferOES(GL_FRAMEBUFFER, GL_COLOR_ATTACHMENT0, GL_RENDERBUFFER, colorRenderbuffer);

	//GLuint depthRenderbuffer;
	glGenRenderbuffersOES(1, &depthRenderbuffer);
	glBindRenderbufferOES(GL_RENDERBUFFER, depthRenderbuffer);
	glRenderbufferStorageOES(GL_RENDERBUFFER, GL_DEPTH_COMPONENT16, width, height);
	glFramebufferRenderbufferOES(GL_FRAMEBUFFER, GL_DEPTH_ATTACHMENT, GL_RENDERBUFFER, depthRenderbuffer);

	GLenum status = glCheckFramebufferStatus(GL_FRAMEBUFFER) ;
	if(status != GL_FRAMEBUFFER_COMPLETE) {
		NSLog(@"failed to make complete framebuffer object %x", status);
	}

	sample = [[OpenGLSample alloc] init];
	[sample setContext:myContext];
	[sample setupGL];
}

-(UIImage *) renderWithSize:(CGSize)size
{
	myContext = [[EAGLContext alloc] initWithAPI:kEAGLRenderingAPIOpenGLES2];
	width = size.width;
	height = size.height;

	[EAGLContext setCurrentContext:myContext];
	[self setupOpenGL];

	glViewport(0,0,width,height);

	glBindFramebufferOES(GL_FRAMEBUFFER_OES, framebuffer);
	glBindRenderbufferOES(GL_RENDERBUFFER_OES, colorRenderbuffer);

	// --- DRAW CODE HERE ---

	// grabbing image from FBO

	GLint backingWidth, backingHeight;

	glGetRenderbufferParameterivOES(GL_RENDERBUFFER_OES, GL_RENDERBUFFER_WIDTH_OES, &backingWidth);
	glGetRenderbufferParameterivOES(GL_RENDERBUFFER_OES, GL_RENDERBUFFER_HEIGHT_OES, &backingHeight);

	NSInteger x = 0, y = 0;
	NSInteger dataLength = width * height * 4;
	GLubyte *data = (GLubyte*)malloc(dataLength * sizeof(GLubyte));

	glPixelStorei(GL_PACK_ALIGNMENT, 4);
	glReadPixels(x, y, width, height, GL_RGBA, GL_UNSIGNED_BYTE, data);

	CGDataProviderRef ref = CGDataProviderCreateWithData(NULL, data, dataLength, NULL);
	CGColorSpaceRef colorspace = CGColorSpaceCreateDeviceRGB();
	CGImageRef iref = CGImageCreate(width, height, 8, 32, width * 4, colorspace, kCGBitmapByteOrder32Big | kCGImageAlphaPremultipliedLast,
									ref, NULL, true, kCGRenderingIntentDefault);

	UIGraphicsBeginImageContext(CGSizeMake(width, height));
	CGContextRef cgcontext = UIGraphicsGetCurrentContext();
	CGContextSetBlendMode(cgcontext, kCGBlendModeCopy);
	CGContextDrawImage(cgcontext, CGRectMake(0.0, 0.0, width, height), iref);
	UIImage *image = UIGraphicsGetImageFromCurrentImageContext();
	UIGraphicsEndImageContext();

	free(data);
	CFRelease(ref);
	CFRelease(colorspace);
	CGImageRelease(iref);

	[EAGLContext setCurrentContext:nil];

	return image;
}

@end
© 2024 thomasguenzel.com

Theme by Anders NorenUp ↑